

Nat (Network Address Translation) has become so popular that almost all small routers ,firewall software and operating system supports atleast one NAT mode. This shows how important is NAT.
The NAT concept
In simple words NAT is used to provide communication between Public IP address and Private IP address.
What is the difference between public and private IP address?
Private IP address is used in LAN, all the devices that are connected to LAN should have a private IP address.
Example: IP address of my PC which is connected to a LAN is 192.168.1.1 , because it is an public IP.
A public (or external) IP address is the one that your ISP (Internet Service Provider ) provides to identify your home network to the outside world. It is an IP address that is unique throughout the entire Internet.
NAT is not only used for networks that connect to the internet. We can configure a NAT in our LAN network also.
Why do we need NAT ?
When there was lack of ip address scientists came with a solution called NAT. This helps to divide the IP address into 2 known as public ip address and private ip address. Overview
Not so long ago , Internet had a problem. There was a high demand for internet access but , only a limited number of ips. One solution to this problem was the creation of NAT, which resolves multiple ips into single address.
How does NAT works ?

Basically ,Nat allows a single device, such as router to act as an agent between Internet and the local network . which means that only a single unique IP address required to repersent the entire group of computers to anything outside the network.
How to i configure NAT ?
In order to configure traditional NAT , you need to make atleast one interface on a router and set of rules for translating the IP address in the packet header need to be configured.
NAT Configuration
There are few methods (and commands) that are used to configure NAT. The main three methods include one for static NAT, one for Dynamic NAT, and one for TCP load sharing.
Static NAT Configuration
There a few steps that are required when configuring static NAT; the number of the commands depends on whether there will be more than one static translation:
| 1 | Enter global configuration mode. | router#configure terminal |
| 2 | Configure the static NAT translation (this command can be used multiple times depending on the number of static translations required). The overload keyword enables the use of PAT. | router(config)#ip nat inside source static local-ip global-ip [overload] |
| 3 | Enter interface configuration mode for the inside interface. | router(config)#interface interface-id |
| 4 | Configure the interface as the inside NAT interface. | router(config-if)#ip nat inside |
| 5 | Enter interface configuration mode for the outside interface. | router(config-if)#interface interface-id |
| 6 | Configure the interface as the outside NAT interface. | router(config-if)#ip nat outside |
| 7 | Exit configuration mode. | router(config-if)#end |
Static NAT Configuration Example
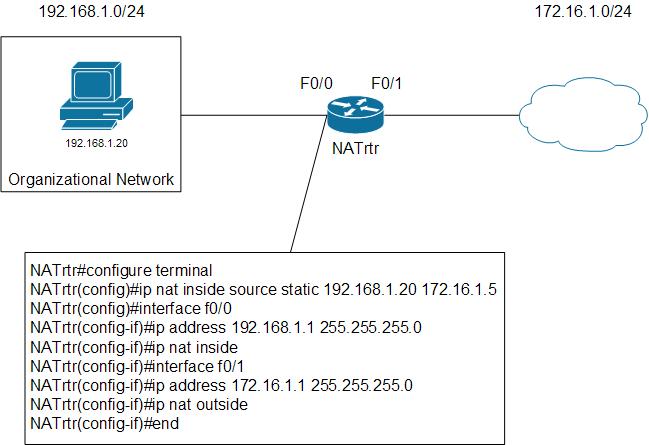
To ensure the configuration of static NAT is clear, let’s look at an example (Figure 1) that explains the concepts described above:

In this example, the inside host 192.168.1.20 will be translated to 172.16.1.5 when sending traffic out of interface f0/1.
Dynamic NAT Configuration
Dynamic NAT requires a few additional commands over a static configuration as the source of the traffic and the NAT address pool must be configured:
| 1 | Enter global configuration mode. | router#configure terminal |
| 2 | Configure the dynamic NAT address pool. | router(config)#ip nat pool pool-name start-ip end-ip {netmask netmask | prefix-length prefix-length} |
| 3 | Configure a static access list to define the addresses to be translated. | router(config)#access-list access-list-number permit source [source-wildcard] |
| 4 | Configure the dynamic NAT translation. The overload keyword enables the use of PAT. | router(config)#ip nat inside source list access-list-number pool pool-name[overload] |
| 5 | Enter interface configuration mode for the inside interface. | router(config)#interface interface-id |
| 6 | Configure the interface as the inside NAT interface. | router(config-if)#ip nat inside |
| 7 | Enter interface configuration mode for the outside interface. | router(config-if)#interface interface-id |
| 8 | Configure the interface as the outside NAT interface. | router(config-if)#ip nat outside |
| 9 | Exit configuration mode. | router(config-if)#end |
Dynamic NAT Configuration Example
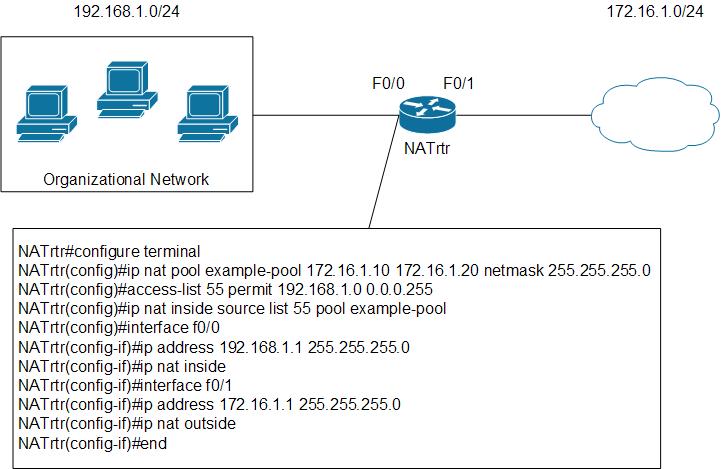
To ensure the configuration of dynamic NAT is clear, let’s look at an example (Figure 2) that explains the concepts described above:

In this example, the hosts that have addresses from 192.168.1.1 through 192.168.1.254 will be translated to an address from the pool which includes addresses from 172.16.1.10 through 172.16.1.20; if a 12th host attempts to send traffic out of the f0/1 interface, the translation will fail.
TCP Load Balancing Configuration
The TCP load balancing feature enables the ability to assign a single outside address that is translated into one of a pool of addresses in order to balance the load of traffic over a number of different hosts. The following commands are used to configure TCP load balancing:
| 1 | Enter global configuration mode. | router#configure terminal |
| 2 | Configure the NAT address pool that contains the list of real host IP addresses to load balance to. | router(config)#ip nat pool pool-name start-ip end-ip {netmask netmask | prefix-length prefix-length} type rotary |
| 3 | Configure a static access list to define the virtual address that will be used for outside communication. | router(config)#access-list access-list-number permit source [source-wildcard] |
| 4 | Configure TCP server load balancing. | router(config)#ip nat inside destination-list access-list-number pool pool-name |
| 5 | Enter interface configuration mode for the inside interface. | router(config)#interface interface-id |
| 6 | Configure the interface as the inside NAT interface. | router(config-if)#ip nat inside |
| 7 | Enter interface configuration mode for the outside interface. | router(config-if)#interface interface-id |
| 8 | Configure the interface as the outside NAT interface. | router(config-if)#ip nat outside |
| 9 | Exit configuration mode. | router(config-if)#end |
TCP Load Balancing Configuration Example
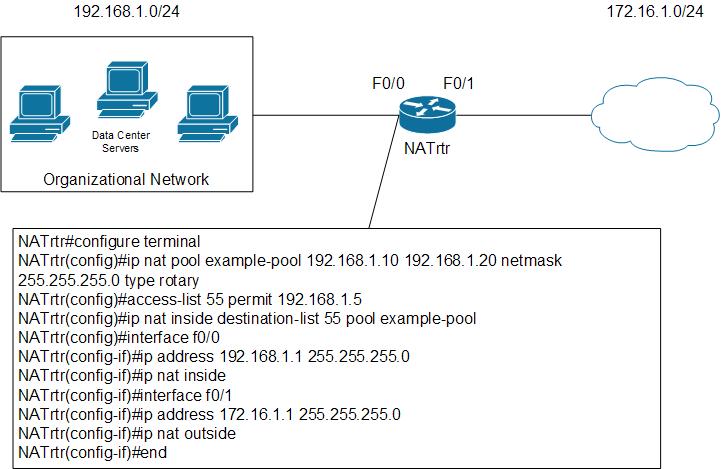
To ensure the configuration of TCP load balancing is clear, let’s look at an example (Figure 3) that explains the concepts described above:

In this example, all traffic that is addressed to 192.168.1.5 will be translated and sent to the hosts with addresses from 192.168.1.10 through 192.168.1.20 in a round robin fashion.
Summary
There are certainly many different situations where the functionality of NAT can be used. This article takes a look at some of the ways that NAT can be configured and offers examples of how the functionality can be implemented. Hopefully this article has made the concepts and configuration of NAT a little simpler to understand so that they can be implemented with little trouble or confusion.
